
Kết quả 1 đến 1 của 1
Hybrid View


-
24-06-2024, 04:02 PM #1
 Silver member
- Ngày tham gia
- Nov 2015
- Bài viết
- 98
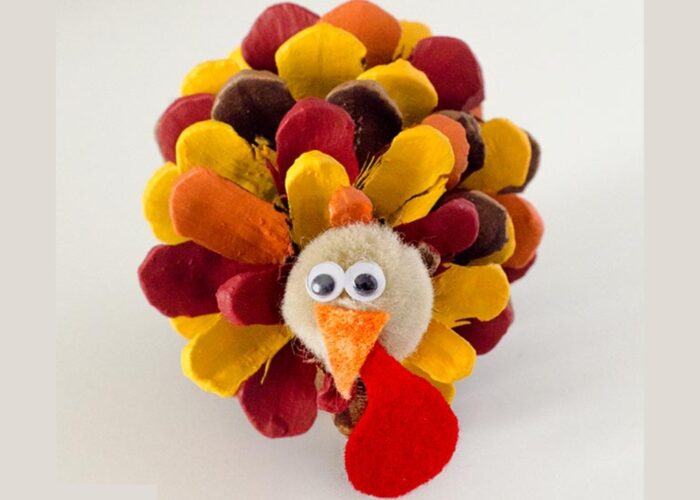
Crafting a Festive Pine Cone Turkey: A Step-by-Step Guide
Making a turkey with pine cones is a fun and creative craft project, especially suitable for fall and Thanksgiving decorations. Here’s a step-by-step guide on how to make one:
Materials Needed:- Pine cone
- Brown paint (optional)
- Googly eyes
- Red and yellow felt or construction paper
- Orange pipe cleaner or construction paper
- Glue (hot glue gun works best)
- Scissors
Instructions:- Prepare the Pine Cone:
- If desired, you can paint the pine cone brown to give it a more consistent color. Let the paint dry completely.
- Make the Turkey’s Face:
- Glue the googly eyes onto the narrower end of the pine cone, which will serve as the turkey's head.
- Cut a small triangle from the orange felt or construction paper for the beak and glue it below the eyes.
- Cut a small wattle shape from the red felt or construction paper and glue it next to the beak.
- Create the Turkey’s Feathers:
- Cut feather shapes from the red and yellow felt or construction paper. You can make as many as you like, typically 5-7 feathers give a full look.
- Glue the feathers to the back of the pine cone, arranging them in a fan shape to resemble a turkey's tail.
- Make the Turkey’s Legs:
- Cut two short pieces from the orange pipe cleaner or construction paper for the legs.
- Attach them to the bottom of the pine cone, either gluing or tucking them into the pine cone scales.
Optional Steps:- Additional Decorations:
- You can add other embellishments such as glitter, small bows, or a tiny hat to personalize your turkey.
Display:- Once the glue is dry and the turkey is fully assembled, find a place to display your pine cone turkey. It can be used as a table centerpiece, a part of a festive display, or a fun decoration for kids' rooms.
This craft project is simple and allows for a lot of creativity. Enjoy making your pine cone turkey!
Source: https://thanhcongcraft.com/how-to-ma...afts-for-kids/View more random threads:
- Review những thiên đường sống ảo bậc nhất hiện nay tại Phan Thiết
- Khu căn hộ Him Lam Phú An kênh sinh lợi
- Pallet nhựa chân cốc giá tốt nhất 2024
- Phương pháp làm hồng vùng kín bằng công nghệ laser s là gì? Hiệu quả ra sao ?
- Ý nghĩa của tượng cho đá phong thủy _linh vật xua tan tà khí
- Các nguyên liệu từ rừng: Nét độc đáo của ẩm thực người M’nông
- Các bước khi mua bán pallet nhựa thủ Đức
- Bí quyết tránh những biến chứng trong quá trình phục hồi sau nâng mũi ở Đà Nẵng
- Các loại dương vật giả thông dụng hiện nay, quý cô nên biết
- Tìm hiểu phẫu thuật vùng kín tại Đà Nẵng: Chất lượng và giá cả

 Trả lời kèm Trích dẫn
Các Chủ đề tương tự
-
How to Build a Traditional Thatched Roof with Palm Fronds: A Step-by-Step Guide
Bởi Thanhcongcraft trong diễn đàn Rao vặt tổng hợpTrả lời: 0Bài viết cuối: 26-04-2024, 03:41 PM -
Mastering the Art of Willow Basket Weaving: A Step-by-Step Guide
Bởi Thanhcongcraft trong diễn đàn Rao vặt tổng hợpTrả lời: 0Bài viết cuối: 23-02-2024, 04:17 PM -
How to Craft a Handmade Rattan Basket: A Step-by-Step Guide
Bởi Thanhcongcraft trong diễn đàn Rao vặt tổng hợpTrả lời: 0Bài viết cuối: 03-01-2024, 04:03 PM -
A Step-by-Step Guide for an Eco-Friendly Garden Project: Bamboo Plants Pot
Bởi Thanhcongcraft trong diễn đàn Rao vặt tổng hợpTrả lời: 0Bài viết cuối: 26-12-2023, 03:58 PM -
How to Craft Your Own Bamboo Flute: A Step-by-Step Guide
Bởi Thanhcongcraft trong diễn đàn Rao vặt tổng hợpTrả lời: 0Bài viết cuối: 18-12-2023, 03:44 PM


Cá hồi Theo thầy thuốc Hồng Gấm, cá hồi nức tiếng vì giàu acid béo omega-3 tốt cho sức khỏe tim mạch và đời sống chăn gối. Bên cạnh cá hồi thì cá mòi, cá ngừ, cá bơn… cũng giúp đời sống tình dục...
Nam giới ăn sai đạm: Tưởng khỏe...